
|
Nelumbo (Lotus) From Seed & Seedling Cultivation Photos by Kit Knotts - Click to enlarge |
|
The seed of the Lotus (Nelumbo sp.) is a very hard nut and is almost completely impermeable to water. It remains viable for many years; some evidence indicates over two hundred years at least. If the seed is placed into an ideal habitat for growth, it may still remain dormant for many decades before sprouting. It seems almost counterintuitive that being resistant to sprouting has a survival advantage. Researchers who have worked with the plant have theorized on why having seeds that are so difficult to germinate is advantageous to survival. The probable reasons for this survival tactic in the genus Nelumbo are two fold. The first is that when the lotus occupies an area, it spreads rapidly by vegetative means until every suitable site is covered. If a seed sprouts in such an environment, it will have little chance for survival because it will be shaded out. The second reason is that the tubers of the lotus are very nutritious. Humans also find them good food (you can find them as a fresh or canned vegetable in Asian food markets). If any aquatic herbivore (muskrat, beaver) pair happens upon the growing site, it will establish a home there and raise a family of several generations until the entire stand is devoured. If the surviving dormant seeds then proceed immediately to germinate, the succeeding generation would also be eaten. Consequently, until the herbivores move out for lack of food, it is best for the seeds to remain dormant for a while. |
| Preparing Nelumbo Seeds for Germination | |
 Pointed end |
Nelumbo seeds are either round and the size of a green pea or oval and the size of a shelled peanut. One end of the seed has a sharp point which is the remains of the floral stigma. On the opposite end is a tiny dimple, a remnant of where the seed was attached to the mother plant The seed color can vary from gray to dark brown or black. The shell is very hard and consists of two layers which are tightly bonded together. Inside the shell are two paper thin brown colored seed coats which enclose the twin cream colored cotyledons. This feature is what places the Nelumbo genus into the Dicotyledon subclass of flowering plants (Angiosperms). Between the cotyledons is the Nelumbo embryo which consists of two prominent inrolled leaves with attendant stem. The leaves are doubled over against the stems because of the tight space. When the seed sprouts, the stems elongate to push the inrolled leaves up to the water surface. On the way up, the doubled over leaves straighten up and unroll after they reach the surface. There they become the round water-repellent floating leaves which are so characteristic of the Nelumbos. There are no intermediate underwater leaves that are typical for the waterlily family (Nymphaeaceae). This is one of the many reasons for the recent assignment of the Nelumbo genus into its own separate family, the Nelumbonaceae. |
 Dimpled end |
|
 Click image to enlarge |
|
|
The inherent characteristic of the Nelumbo seed is to remain dormant for many years even if the environment is perfect for them. This resistance to germination is caused by the seedcoat which is almost impermeable to water penetration. The secret for speeding up the germination process is to remove this protective cover without harming the internal seed. Many methods of doing this have been described in the literature (including soaking in concentrated sulfuric acid for 5 hours), but the method I use is easily available to every one. The primary tool is a pair of pliers which has the usual pipe grip cutout at the business end. The pliers are used to get a firm grip on the seed within the oval pipe grip section of the pliers. The seed is very tough and you do not have to grip the seed so hard as to crack it. The seed is then rubbed along a rough surface to wear away part of the seed coat. The preferred surface is a medium grit sand paper laid flat on a table, although a concrete surface or file can be used. The optimum grit size for the sandpaper is # 80, although a finer grit (higher number) can also do the job. It just takes more rubbing and the sandpaper wears out sooner. You will then appreciate how hard the seedcoat really is. There are two areas where the seed scouring can take place: on the side or at the dimpled end. I prefer the side because the progress of the rubbing (or sanding) is more uniformly determined. When scouring the side, rub the seed in one area only. This will produce a shiny flat surface as the rubbing proceeds. This surface should be inspected frequently to check the process of the wearing away process. At first, the surface is a uniform black color. As the rubbing proceeds, a thin white line circle or oval will appear, depending on the seed type. This indicates the breaking through of the junction between the two fused seed coats. At this point you can stop the rubbing. If you have missed this point in the rubbing process (it is sometimes difficult to see), and you continue on rubbing, you will eventually see a cream colored area coming into view in the center. If you stop here you will still have satisfactorily rubbed the seed. If the area suddenly brightens into a clear cream color with a distinct edge, it means you have broken into the cotyledon. This opens the seed to possible fungal infection. But save the seed anyhow, it may survive. If you rub, file or sand the dimpled end, the sequential events are not so clear cut as described above because the seed structure is not as uniform. In fact, there is an irregular airspace between the seed shell and the cotyledon and you may break into it before the cotyledon is reached. This is an acceptable result for seed preparation, but not consistently attainable. Those of you who have an adventurous nature may want to attempt this route. As a further comment, this is the seed end where the seedling emerges from the shell. After the above preparation, the seed is placed into a container of water. I find clear plastic cups work out well. Place the cups with the seeds in a warm place where the water will remain between 70 and 90 F. Temporary movements outside this range will do no harm; however, the cooled temperatures will delay the sprouting and growth rate of the seedling. The first thing you will notice after a few hours is a change in the color of the water: it will either turn a clear tan color or cloudy white. The cloudy color is caused by bacteria feeding on the exudation from the seed. If the water is not replaced, a thin scum will form on the water surface. The rapidity at which this occurs depends upon the container size; the greater the water volume, the less the effect. Nevertheless, the water should be changed and container walls scrubbed to keep the environment reasonably clean. I have not seen where slightly cloudy water harms healthy seeds, but I haven't tested the limits. When the water starts out with a clear tan color, it seems to suppress the bacterial influx.
After the swelling is completed, there will be a period of no activity as the seed thinks about whether or not to burst out from its shell. This can happen anywhere from one day to several weeks.
< Day 1 |
|


 Day 2  Day 3 |
The fish hook bend in the leaf stem slowly straightens out while the stem continues to grow until it is at least eight to fifteen inches long. Consequently, because the stem is fairly stiff, the leaf may be pushed out of the water if the depth is less than eight inches. With a moderate water depth, the leaf stem will start to bend over and push the leaf horizontally just beneath the surface. For deeper water the stem will continue to grow vertically until the leaf reaches the surface. At that point, the inrolled leaf begins to grow and expand until it floats flat on the water. The leaf diameter will be between one and two inches. The period of time to reach this stage is about ten days after sprouting. After the leaf has unfurled, the stem does not readily accommodate water level changes, so if you intend to transplant the lotus later into a pond, the new water depth should be similar. The seedling can be planted or potted at this stage, but since the roots have generally not yet formed, it isn't necessary. Nevertheless, one should keep an eye on the unplanted seedling for root inauguration. Planting the seedling before or at the beginning of root growth prevents subsequent root damage. The seed contains enough food to sustain itself without extra nutrition until after the first four floating leaves have formed, about 30 days after the seed has sprouted. If the seedling is to be potted before being set out into its final location, the pot should have a surface diameter of at least eight inches. The height need not be more than about five inches; however, anything larger is always beneficial. The reason for this is that while the first four leaves are forming, the Nelumbo starts developing a rhizome which needs to run several inches before the next leaves are formed. If the edge of the container is reached before this happens, the growth of the plant can be distorted. If the rhizome is not deflected to the right or left (which is often the case), the rhizome growth will push the plant center out of the soil. If the rhizome is deflected to the right or left, the growth will circle the container if it is round. If square, the potential for uprooting will repeat at every corner. I have found that the preferred potting soil for Nelumbo seedlings is heavy loam; however, I encourage experimenting with different soils if you have multiple seedlings. |
 Day 7 |
 Day 8 First Leaf  Day 8 Second Leaf  Day 8 Roots |
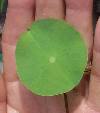
After the first leaf has unfurled, or a bit earlier, the second, third and fourth leaves come to the surface in orderly sequence. All these leaves come from a common node next to the seed. While these leaves are coming up, the plant starts to send out the horizontal rhizome from which the fifth and subsequent leaves will grow. Now that most of your Nelumbo seedlings have produced their first floating leaves, what next? These leaves are remarkably suited for a floating existence. The leaves refuse to allow water to remain on its surface. Water rolls off like quick silver. Nevertheless, this surface invites many aphids which appear almost miraculously even though the pond has not seen them before. In some cases they are brought in by ants which tend them like cows. The ants eat the sweet droplets that exude from the aphids. Aquatic snails attack the leaves from underneath and eat holes in them. Sometimes the snails can't wait to reach the leaves and nibble on the leaf stem on the way up. The consequence is that soon you find some leaves floating free on the water surface. Caterpillars can also appear and eat the surface layer of the leaves. By inspecting the leaves periodically, these pests can be easily seen and manually removed without the use of chemical sprays. |
 Top to bottom - first four leaves 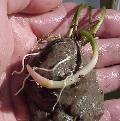 First runner with growing tip |
Growing On The Nelumbo Seedlings After the first four floating leaves are formed, the plant spreads by forming rhizomes with one leaf appearing at each internode. Side shoots occasionally appear at the internodes which allow for lateral spreading. The leaf diameters progressively increase and eventually are lifted clear of the water surface. In some instances during the first year of growth, the plant may pass through a temporary resting period. In these cases, growth ceases, the leaves turn yellow and the plant appears to be dying. This is a perfectly normal development for these plants during which the rhizome thickens to form a small banana shaped tuber. The plant then remains dormant for about three weeks when it starts growth again with renewed vigor if the water is warm. During the first year of growth, only leaves are produced in most cases. Flowers are not generally produced until the second year. As the days get shorter in autumn, the leading rhizomes grow deep underground and form large resting tubers where they wait out the winter. All the leaves turn brown and only the resting tubers remains alive to start growth again the next spring. These resting tubers are edible and are a favorite food item in Japan and China. The Indians in America also used them as food. |
Profile - Walter Pagels
Lotus Growing Basics | Winter Care For Lotus