With Digital Cameras
By Louis Belloisy
Click images to enlarge
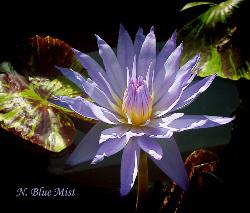
Photographing waterlilies and duplicating their bold or delicate colors is sometimes a difficult task. The following are the methods I use for a digital camera.
Digital cameras:
I use the Canon D-30 3 megapixel camera and an older Sony DSC-770 1.3 megapixel camera. The Sony has a fixed zoom lens whereas the Canon accepts a multitude of the Canon FD lenses. I like using the Canon 100 mm Macro lens for close-ups.
Filters:
I use the circular polarizer filter for most of the photos. By using this filter you can eliminate almost all of the reflections and glare from the water and make the surface of the water dark. You can then concentrate on the flower and pads. In order to use this filter to its maximum, you must have the sun 90 degrees to the subject. Rotate the filter until you see no or minimal reflections in the viewfinder. There is a little white dot on the outer ring of the filter that is usually pointed at the sun when you have the view that you like. I like to photograph the flower with the sun either behind it or at a back angle. I have found that photographing the flowers in a non-sun or cloudy environment will not duplicate the colors properly and give them a muddy appearance.
Digital cameras, settings:
I use the following settings on my cameras. Most digital cameras will have similar features:
ASA - 100 or 200, the lower the number the less noise (grain) on the photo.
Lens - Aperture Priority, you control the aperture for maximum or minimum depth of field, the camera will adjust the shutter speed. If the camera wants to set the shutter lower than 90/ sec, adjust the aperture to a lower number to raise the shutter speed. If you are hand holding the camera, any speed lower will create a blur caused by camera motion or wind. If you use a tripod and the wind is still, you can use any setting that you would like to get the desired results.
Contrast - None or soft.
Sharpness - None or soft.
Exposure - If you are photographing a lily in bloom with the sun behind or at an angle and you leave the camera to its own designs, it will do average exposure compensation and leave you with a less than desirable photo. Think of photographing a white cat in a snow bank -- to get details you must underexpose a bit.
 In
order to duplicate the colors and details of the flower I usually
drop my f-stop down by ½ or more in order to saturate
the colors. (This is called underexposure). If the camera is
left to its own designs, it will not give you an accurate exposure
due to the lightness of the flower and the darkness of the background.
This method lets you expose for the flower and you will get all
the details and accurate colors.
In
order to duplicate the colors and details of the flower I usually
drop my f-stop down by ½ or more in order to saturate
the colors. (This is called underexposure). If the camera is
left to its own designs, it will not give you an accurate exposure
due to the lightness of the flower and the darkness of the background.
This method lets you expose for the flower and you will get all
the details and accurate colors.
Most digital cameras have a provision to set the white balance. This is most important. You can use the automatic settings of the camera or if the camera allows, you can set your own custom white balance by taking a photo of a white object, in the same light as the flower you are taking a shot of, using the cameras instructions to set the balance. By doing this, it gives the camera some guidance, tells it what is white and the camera will correct the other colors (hopefully). Some people take a photo of a piece of 8 x 10 print paper. This can give erroneous readings because most print paper has a slight tint of blue. Most camera shops sell white or gray cards for custom white balance. Gray cards will work but, in my opinion, are not as good as white. That is why they call it white balance.
Focusing - I like to set the camera to manual focus on close ups. On auto focus the camera might hunt for a focus point.
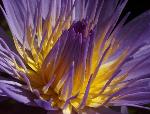 For
a close up, I usually set my aperture for the smallest that the
camera will allow for, hand held or tripod. By doing this I will
get the maximum depth of field. On close ups, the depth of field
(all that is in focus) is usually shallow. If you focus on a
stamen, the petal behind it might be out of focus. I focus on
the stamens and usually the rest of the flower is in sharp focus
also. Remember the smaller the aperture, the greater depth of
field (focus).
For
a close up, I usually set my aperture for the smallest that the
camera will allow for, hand held or tripod. By doing this I will
get the maximum depth of field. On close ups, the depth of field
(all that is in focus) is usually shallow. If you focus on a
stamen, the petal behind it might be out of focus. I focus on
the stamens and usually the rest of the flower is in sharp focus
also. Remember the smaller the aperture, the greater depth of
field (focus).
Recording on your memory card:
Try to use the highest setting that the camera will allow, usually called "fine Jpeg". If your camera can store in the TIFF format, that would be ideal, since there would be no loss due to compression.
To relate the exposures of a digital camera to a film camera, think of digital as a slide photo as opposed to film photos. In film, you would overexpose to saturate your colors whereas in digital, you underexpose to saturate.
Try to fill your frame with the photo that you want so that there is minimal cropping in processing. When you crop, you throw away pixels. The more pixels the better, especially if you want to send your file out for printing or in-house printing.
Final processing:
I use Adobe Photoshop 7.0 which is the Cadillac of the graphics programs. There are other programs that can do a great job as well such as the lesser priced Adobe Elements 2.0 .
In the paragraph labeled camera settings, I mentioned to set the camera settings for contrast and sharpness to the off or soft position. By doing this, it allows you to control the final color, sharpness and contrast using the graphics program of your choice.
Saving photos for the web or email:
Not everyone has a T1 or a cable connection, so taking this in consideration, when you are finished processing your photo you must do two things.
First - save a finished photo on your hard drive in
the TIFF mode and in the original size, using the "save
as" command on the graphics program usually under FILE.
When you click on "save as" it will give you  the
option to save as JPEG, or TIFF. By choosing the TIFF format,
you can open and close your photo as many times as you like and
there will be no degrading of the photo. If you save and reopen
in the JPEG format, each time you do this, you eliminate some
pixels, and the photo will eventually loose its snap. You have
saved one photo in the original size and in the TIFF mode so
now you want to save one in the JPEG method.
the
option to save as JPEG, or TIFF. By choosing the TIFF format,
you can open and close your photo as many times as you like and
there will be no degrading of the photo. If you save and reopen
in the JPEG format, each time you do this, you eliminate some
pixels, and the photo will eventually loose its snap. You have
saved one photo in the original size and in the TIFF mode so
now you want to save one in the JPEG method.
Second, save for web or email:
Resize your image to the universal size of 640 x 480 pixels, using Image and Image Size from the toolbar and again using the "save as" command, select JPEG and when the JPEG OPTIONS dialog box comes up, slide the "Quality Slider" to a file size under 50K or about 5 on the slider. This will allow the photo to be transmitted in a short time.
Lou's Home Greenhouses
Lou's Web Site