
Step By Step
By Kit Knotts - Photos by Ben Knotts
We have great success improving the germination of stubborn Victoria seeds by removing the operculum, a process we call "nicking" for brevity. WE MEAN PRECISELY THAT -- removing the operculum, not penetrating the seed coating in any other way. Other penetration will damage the seed and will not improve germination.
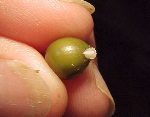 |
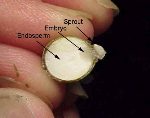
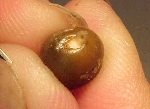
To illustrate why we do this so precisely, we are showing a germinated seed. When a Victoria seed sprouts, it only sprouts out of the operculum because the embryo, the future little plant, is directly beneath it and the door is the weak point in the seed. At the right, the translucent ball at the base of the sprout is the embryo. The larger white mass is the endosperm, food for the future seedling. |
 |
|
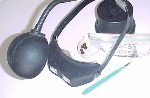
You will need some tools and equipment to do the job right -- bright light (we use a halogen reading lamp), magnification (we use loupes), a scalpel or X-acto knife with very pointed tip, a little container with water for unnicked seeds and a bag with water for nicked seeds. You will also need a towel or paper towel to dry the seed while you work on it but ONLY keep the seed out of water as long as necessary to nick it. |
 |
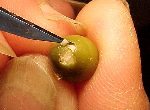
First we must locate the operculum which sometimes means scraping off sluffing seed coat. Rub and rotate the seed until you find the "trapdoor". I am left-handed so this operation may be backwards for many. |
 |
Place the tip of the knife (I rotate the sharp edge away to prevent accidental slicing) just under the micropyle, the bump within the total operculum. Just penetrate the seed coating (you will sometimes see a tiny bubble of liquid as you do so -- dry it) and in a quick motion pop the knife tip upwards. |
 |
In this case the the door popped off perfectly, revealing the pearly white top of the embyro, often with a tiny "nipple" right in the center. Great care must be given to NOT damaging the embryo! Don't prick it, puncture it, slice it or scrape it! |
 |
The door doesn't often pop off at the first attempt. More often only part of the door will break away and then you must remove the rest. There are actually two layers involved, the first the seed coating and then a tan-pink membrane that must also be removed. |
|
The second attempt, with the knife a little to the bottom of the door in the image, removed the balance of the door. The underside of the operculum, with the membranous layer still attached, is visible to the right of the opening. |
 |
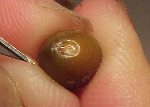
Though there are times you must remove the door piece by piece, this example is WAY too much. Too much of the coating has been chipped away and the embryo itself has been punctured and scraped. This one was thrown away. |
Be sure to put nicked seeds right back in water!
After several weeks, we renick the seeds that haven't sprouted. This amounts to running the tip of the knife, sharp edge up, very lightly just under the edge of the existing opening. This removes anything left behind from the first nicking in some cases and overall creates another batch of sprouts within a few days. This can be repeated as long as the seeds still appear healthy. We see no difference in viability of seedlings among those nicked, renicked or sprouting on their own.