Pond Building With Concrete
Paradise Style
Click images to enlarge
All of our ponds are concrete. Our climate allows us to use concrete without the worry of cracking due to freezing and thawing and we prefer it to liners for a variety of reasons. We feel concrete ponds are more permanent, less slippery, provide a better environment for pond balance, permit flexibility in design, allow for "set" stone edges, walls and falls.
Cost is a factor too. We have found that bagged concrete mix is considerably less expensive than a good quality liner of the same size. Granted the mixing and setting is labor intensive but it's great exercise. We prefer the bagged mix to piles of materials but if we remember the formula correctly it is "3-2-1", three parts lime rock or pea gravel to two parts sand to one part cement.
We have never had a problem with pH high enough to bother plants from using concrete. For new ponds, sometimes sealed and sometimes not, we adjust the pH a few times with vinegar and then leave them alone. Older ponds occasionally crack from settling or invading plant roots but the cracks are easy to find and easy to repair with hydraulic cement.
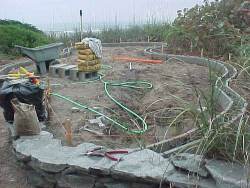
We have learned a lot about pond building by trial and error, the following from error. We DO NOT make elaborate forms but rather use the hole as its own form. We DO NOT use sheet plastic between the soil and the concrete - the concrete just slides on it, making building the sides difficult. We generally DO NOT put rebar or wire in the concrete. And above all we DO remember that water makes itself level and an unevenly leveled pond reveals ugly edges. We DO NOT do any stone work until the pond is full and we are positive it is level.
Our ponds are knee-deep, some a little deeper and some a little shallower. This is ideal for most plants in pots, providing about 12" of water over the crowns. For plants that like deeper water, we will build deeper depressions into the bottom and fill them with dirt. We always add a thin layer of dirt back to ponds to darken the bottom and to jump start pond balance. In some cases where we want plants' roots to range freely (especially ponds built for Victoria) we will dig the ponds deeper and add a thick layer of dirt (8-16") back to them.
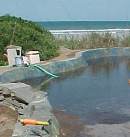
Most of our ponds are in the ground so the hole itself is the form. We dig a basic shape and make the final cut of the edges just before we begin to set concrete to avoid erosion of the "form". We start setting at the top, "hanging" the VERY LEVEL upper lip on the edge. We then build the sides up to meet the lip. Consistency of the concrete is important since it must be slapped in place and stay put. We don't work the concrete too much because it will "slump" and we want somewhat rough sides for future algae to adhere to. We mix only the amount we can set fairly quickly because the concrete can get "hot" and begin to set in the cart.
Don't forget to create a place for overflow (pipe or lower
area) when setting the lip!
 |
 |
 |
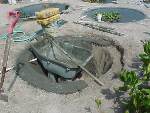
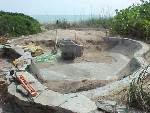
| This is one of the "Pod Pools", a group of small ponds designed for growing out individual crosses of waterlilies. They are deep enough to add back 8-10" of dirt and still have adequate water over the crowns of the plants. More about the Pod Pools here. | ||
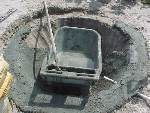
After the sides are finished, we pour in the bottom, "soupier" than for the sides, making sure we "juke" the bottom concrete well up against the sides. It has never been a problem for us that we don't complete ponds all in one day. We are just very careful to overlap stopping points ("cold" joints) really well.
Average thickness of the concrete is 4". The flattened upper lip is only 1-2" but its only job is to provide a stable and level base and for stone flagging. We make the sides as steep as possible to make it easy and safe to step into and out of the ponds.
 In
12 to 24 hours after completion we do graffiti on the sides with
cheap spray paint in blues and greens. This is just to keep the
new pond from looking so new until the pond matures with algae
growth on the sides. If we are only putting a thin layer of dirt
back on the bottom we will roll royal blue cheap latex paint
on the bottom to shimmer through in spots. If we are going to
seal, we pour, sponge and roll on a concrete sealer at this point.
Then we add back whatever dirt we have decided on.
In
12 to 24 hours after completion we do graffiti on the sides with
cheap spray paint in blues and greens. This is just to keep the
new pond from looking so new until the pond matures with algae
growth on the sides. If we are only putting a thin layer of dirt
back on the bottom we will roll royal blue cheap latex paint
on the bottom to shimmer through in spots. If we are going to
seal, we pour, sponge and roll on a concrete sealer at this point.
Then we add back whatever dirt we have decided on.
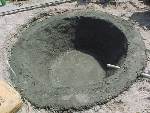
As soon as the paint and sealer are dry we fill the pond.
This is within 24 hours of completion of setting concrete. This
is beneficial to the ultimate strength of the pond since concrete
that dries slowly is stronger than that which dries rapidly.
We reserve some concrete mix to correct the level of the pond
when it is full, usually 1" above drain level. We adjust
the pH with vinegar and a day later introduce plants, fish and
snails. We also bring "pickings" from other ponds which
we allow to rot in the new pond. In a very short time the pond
achieves natural balance.
 |
 |
 |
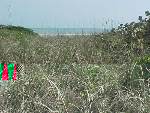
| "Dune" was designed and built to be home to three adult Victorias. It had to built in sections. The complete building of Dune here. | ||
Some of our ponds are either elevated or the landscape slants
end to end. In these cases we use concrete blocks for the above
ground portions, lintel or "knock out" blocks. These
allow us to link them together 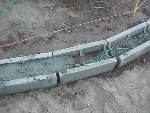 with
thin rebar or steel cable and fill the cells almost full, assuring
strength when the water presses outward on the sides. We then
build the sides just as we do in-ground ponds, hanging the lip
over the blocks and building up to it.
with
thin rebar or steel cable and fill the cells almost full, assuring
strength when the water presses outward on the sides. We then
build the sides just as we do in-ground ponds, hanging the lip
over the blocks and building up to it.
The stone that we use throughout the garden is called Beech Mountain Emerald Gray and comes from quarries in Beech Mountain, North Carolina, by way of our local stone yard. It comes two ways -- thinner pieces suitable for flagging (coping and walkways) and thick chunks for walls and falls. If we are planning a wall or fall of any size, we do put in a reinforced concrete footer to support the additional weight.
Tools list -- shovels, pointed and flat, a flat bottomed cart, a hoe, 2' and 4' levels, grade stakes, string, line level, heavy hammer, pointed trowel, rubber gloves, hose and nozzle, determined muscles, Gatorade.
|
|
|
|