for the Budget Conscious
|
By James Horne, Belleville, Ontario, Canada Having expanded my tropical aquatic and marginal plant collection from the previous year my existing set-up for wintering them over is no longer sufficient. |
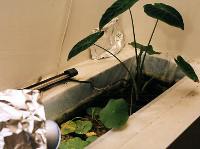 Current set-up |
|
|
I needed more room to house my taro and lilies. Not to mention the new varieties I hoped to grow such as the Australians which required more space and heat, and that I wanted to start my lotuses indoors this year to get a jump on the short summer here in the USDA zone 4 growing region. To that end I decided I needed to build a larger pond, similar in concept to the small one. The obvious place was the basement. Although light is poor there, during the winter most of the light would have to be artificial in any case so it wasn't a huge problem. Further it has a very solid concrete floor so support of roughly 4000 pounds of water wouldn't be an issue. The next decision was how to construct the pond. The goal was to keep it as inexpensive as possible so I could put more money into the lighting. Good lighting is a vital requirement, and typically expensive. (Also I'm cheap, I hate paying more than something is worth.) I considered a bunch of options: kiddies pools, larger soft sided pools, wooden frame liner ponds... They all had drawbacks from my point of view. The rigid kiddie pools I could find were much too expensive or way too small. The soft sided kiddie pools and the larger ones were great ideas, but still moderately expensive. Their biggest drawback though was the soft vinyl construction. I have cats and my fear was it wouldn't take long for them to turn my indoor pond into a flooded basement. Not the best for my basement OR my plants. Wooden frames were a possibility and cheaper than the previous options, but still... Finally I was at a local nursery and they had 3 pallets of old used cement blocks in assorted sizes and conditions, most were chipped, cracked or very worn. The sign next to them said, FREE... Who could argue with that for a price? Now my pond would only cost me the price of the liner. Something I wasn't worried about since I've had good luck with using 6 mil Polyethylene plastic film in my first indoor tank. The plastic is typically sold as vapour barrier for housing construction and a roll of 120' by 8.5' is usually about $20 Canadian. I however happened to have a half roll that I had around for years, so my liner was going to be "free" also. Well ok not really, but for practical purposes it didn't come from current cash flow. And even if I had had to buy it, it was really cheap. So I took my car and picked up the first load of cement blocks. I got 16 and started laying them out in my basement in the area where I wanted the pond, experimenting with size and shape. And also considering how many cement blocks I was going to have to move. |
||
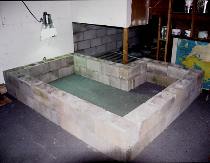 |
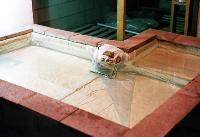
I settled on an L-shape. I built it two rows high to give me a wall height of 16". Then I put a single layer of blocks in the small part of the L to give me a shallow area to use as a "nursery" and to keep marginals in. The main part was 7'10" x 4' inside, the shallow section, 2'x 2'8". This used a total of 48 8" blocks. (Phew! Loading that many blocks into my car, 16-18 at a time and then unloading them and carrying them into my basement was a good Saturday morning's work.) | |
| At this stage I decided that it would be best to do as much of the lighting as I could before the liner went in or the pond was filled. That way there would be no problems with dirt, leaks, or risk of electric shock due to water. I bought a Mercury vapour "security light" from Home Depot. This is a 175W fixture and bulb that produces 7,000 lumens (about 5 times as much light as a 4' fluorescent tube) and has a light sensor on top. Its all metal construction and heavy duty design means it can easily handle being on for 12 or more hours a day. Next I put up several 4' fluorescent fixtures I had sitting around that I had picked up at a garage sale. These were industrial fixtures again, this time with hood and fittings that let them be wired in a daisy-chain. This meant much easier installation due to simpler wiring. These would all have 4' Agro-bulbs installed. The bulbs cost me more than the fixtures, at $6 Canadian each. |
 |
|
|
Now back to the pond. I lined the pond with old carpet scraps scrounged from neighbours who had some that they were wondering how to get rid of... another man's trash... ? The carpet protects the relatively light plastic from the rough cement blocks and from punctures of any stray bits I might have missed cleaning up after putting in the wall. |
||
|
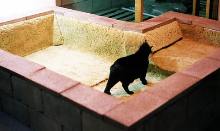
To hold the carpet over the top of the wall I got some cheap 8"x16" paving stones. I actually bought these, the cost was under $50 Canadian. I got the first help at this stage from my inquisitive cats. I'm sure they thought I was building a padded cat lounge. The carpet was cut and laid in with little attention to overlaps. I felt a double layer was better than taking the chance that there'd be a gap that might cause a leak. | |
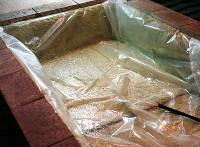
| Now I was ready to put in the real liner. Something I DIDN'T want cats with claws helping me out with. I cut a piece MUCH larger than the pond to allow both for the sides and also to leave me lots to work with. It's easier to cut off the extra after you're done than to try and fix a spot where you're short an 1". Trust me, I know this from experience. | ||
|
While laying the plastic liner in take care to not walk on it if at all possible and also keep it meticulously clean. If you MUST step on it do it in sock or bare feet. Once the plastic is cut and laid roughly in place, with your best efforts at fitting and folding to get everything laying flat, then it's time to add the first bit of water. Just an inch or so. This will provide some weight and let you get the sides nice and flat and even as well as work out wrinkles in the bottom. |
 |
|
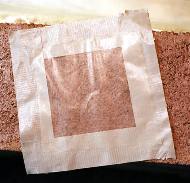
| It also lets you do the first check for leaks without hundreds of gallons of water in the way. Good thing too! I found a leak. If this happens you have two choices, drain the water and put in a new piece of plastic OR patch the leak. I chose to patch mine. The patch consists of a second piece of the plastic, contact cement and heavy duty duct tape. |
 |
|
|
Step 1) Pull the leak, and surrounding area clear of the water. Let it dry, or dry it with a towel. Step 2) While the leak area is drying cut a piece of plastic to allow a 4-6" perimeter around the leak. This will be your patch. Step 3) Coat ONE side of the plastic patch with contact cement, also coat the dried area around the leak. Let the contact cement dry. |
 |
|
|
Step 4) Carefully cut and apply strips of duct tape, to form a complete perimeter around the patch without any wrinkles. Make sure to leave half the width of the tape exposed. This is how it will be held to the plastic liner, and protect the contact cement seal from being peeled. Step 5) CAREFULLY place the patch so the leak is roughly centred.
Work the patch and the tape down so that there are no wrinkles
and everything is pressed firmly together. |
||
| **NOTE: IF the patch leaks I strongly suggest a total liner replacement. DO this with an emergency repair using more duct tape. It CAN be applied underwater and still seal. The plastic needs to be clean and the tape applied smoothly and with a lot of pressure to force the water out from under it. Once this is done, the pump the 1" of water out of the pond. Then cut a new piece of liner (very carefully this time) and put it in. ** | ||
 |
Now the pond liner is watertight, the bottom wrinkle free. Now you can pull the sides smooth and tight and hold them down with the top cap paving stones. If you're like me and you have a shallower section you'll have to stop again when there's an 1" over that section and smooth those bits out like you did before. Then you can finish filling. | |
|
Finally I put about 1"-2" of clean sand in the bottom. This will protect the liner from, rough bricks/stones, sharp pots, bits of whatever and your feet when you climb in to work on things. It also keeps the folds flat so that they can't catch on things. Now you have a large "pond" in the basement, but its pretty plain. OK, UGLY, without any plants and putting in the sand will make it silty and cloudy. You can see one bag of the sand I put in the pond. Total I used 6 50 pound bags... Of course if you have sand available like those Floridians then there's no need to use bagged sand. |
 |
|
|
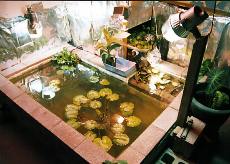
The pond, complete and full of plants Building a Biofilter for the Budget Conscious |
|