
Dixie Cups
Click images to enlarge
Did you ever wonder if you can grow a blooming size tropical waterlily in a 7 ounce Dixie Cup? Sure you can! When people see photos of my small above ground display pond with up to fifty individual tropical waterlilies in bloom they ask me, "How did you do that?"
 My
response is always the same. I grow them in plastic Dixie Cup
drink glasses. This is quite usually met with a puzzled look
as they try to figure out how a waterlily that is known to have
a spread of up to 12 feet, requires so much space and usually
a large pot can bloom in a container that only holds 7 ounces.
The process is quite simple and, if you understand the art of
Bonsai, you will quickly realize that all plants can be grown
out in small containers maintaining the same characteristics
of the parent only on a smaller scale.
My
response is always the same. I grow them in plastic Dixie Cup
drink glasses. This is quite usually met with a puzzled look
as they try to figure out how a waterlily that is known to have
a spread of up to 12 feet, requires so much space and usually
a large pot can bloom in a container that only holds 7 ounces.
The process is quite simple and, if you understand the art of
Bonsai, you will quickly realize that all plants can be grown
out in small containers maintaining the same characteristics
of the parent only on a smaller scale.
 When
I start a new plant for the season, I begin with a fertile soil
mix. Since I usually pot up many at once I mix a few gallons
of soil at a time. The mix I use consists of two parts dark garden
loam/topsoil, one part beach sand or play sand, a few handfuls
of clay soil to bind the mix and a handful of granular slow release
fertilizer usually in a formulation of 10-30-15. All the components
are stirred together in a large bucket and all the Dixie Cups
I need are filled and soaked to eliminate all air bubbles. Once
the air is removed, I drain off the water from the cups and begin
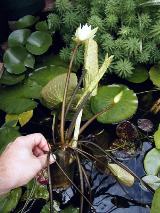
to pot up my new plants, consisting of tuber starts that I grow
out in the method called "chain
propagation" or with "viviparous
starts". Sometimes I will have extra plantlets that
have grown off the side of an established plant that I will pot
up this way also.
When
I start a new plant for the season, I begin with a fertile soil
mix. Since I usually pot up many at once I mix a few gallons
of soil at a time. The mix I use consists of two parts dark garden
loam/topsoil, one part beach sand or play sand, a few handfuls
of clay soil to bind the mix and a handful of granular slow release
fertilizer usually in a formulation of 10-30-15. All the components
are stirred together in a large bucket and all the Dixie Cups
I need are filled and soaked to eliminate all air bubbles. Once
the air is removed, I drain off the water from the cups and begin
to pot up my new plants, consisting of tuber starts that I grow
out in the method called "chain
propagation" or with "viviparous
starts". Sometimes I will have extra plantlets that
have grown off the side of an established plant that I will pot
up this way also.
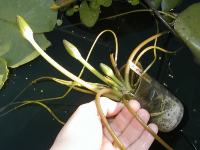 I
use an old pencil as a dibber to make a hole in the center of
each cup of soil to make room for the new plant. I then use a
method I learned from Rich Sacher where you drag the roots of
your small plantlet over dry sand in what can only be described
as Shake and Bake coating the roots with sand. The sand helps
you get the plant into the hole much easier and you do not break
any of the tiny fragile roots. Once all the plants have been
potted up in their new cups I top them all with 1/2 inch of sand
to keep the fertilizer from leaching out.
I
use an old pencil as a dibber to make a hole in the center of
each cup of soil to make room for the new plant. I then use a
method I learned from Rich Sacher where you drag the roots of
your small plantlet over dry sand in what can only be described
as Shake and Bake coating the roots with sand. The sand helps
you get the plant into the hole much easier and you do not break
any of the tiny fragile roots. Once all the plants have been
potted up in their new cups I top them all with 1/2 inch of sand
to keep the fertilizer from leaching out.
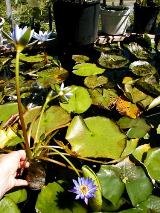
The whole process is standard for potting up a larger waterlily, you just need some patience because your plant material and pot are on a much smaller scale. As each plant is finished with the potting process, I place it in the pond with about one foot between the cups. Within a couple of weeks several decent sized pads are floating and you can usually see the beginning of a new bud on the rise.
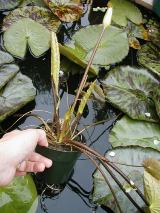 In
order to keep so many plants in such a small space you need to
do daily maintenance by removing excess pads. I usually will
keep between four and seven pads per plant once they begin to
bloom, which allows the lilies to continue to bloom yet not crowd
out their neighbors.
In
order to keep so many plants in such a small space you need to
do daily maintenance by removing excess pads. I usually will
keep between four and seven pads per plant once they begin to
bloom, which allows the lilies to continue to bloom yet not crowd
out their neighbors.
The wonderful benefit of growing these majestic lilies in such small containers is that you still get blooms but they will be smaller than from fully grown out plants. An added bonus to this method is you can almost always be guaranteed that a tuber will be formed on your new plant that can be used for future propagating. I would urge anyone to try this method whether you have plenty of space or not. You will find that, yes, you can tame the beast.
Cheers, Sean
|
|
|
|
|
|
|