
First published in Pond & Garden July-August 2001
Part of the fun of growing waterlilies can be doing a little
hybridizing yourself! It's really pretty simple and might just
produce a wonderful new cultivar that you can name and register.
It requires some basic knowledge of the structure of the flower,
a minimum of equipment and the time to observe your flowers.
Don't feel intimidated by the "mystique" of the past!
Try it!
We began our hybridizing with Victoria, our beloved giant
water platter, but our interest soon expanded to waterlilies.
We were inspired, encouraged and instructed by the legendary
Bill Frase of Orlando, FL. The method we will describe is a traditional
one, though alternative approaches are used by Rich Sacher  in
New Orleans, LA (nicknamed by us the King Bee) and others.
in
New Orleans, LA (nicknamed by us the King Bee) and others.
You will need to know which flower parts are which. Click this image >>>
The first step in creating a new hybrid is to decide what you want to make. Some (like us) have specific goals in mind and limit the number of cross-pollinations attempted to those we think might yield the desired result. Others (like Rich) make lots of crosses, enjoying all the results, especially the greater opportunity for something spectacular. You are likely to decide on crosses that suit your particular growing conditions and tastes. Someone with a small pond should think about compact parents where one with lots of space can think big.
It is generally accepted that hybrids between members of the different subgenera within the waterlily genus Nymphaea cannot be made. Our attempts certainly have been unsuccessful, though we will never say never. (Update May 2002 - Several hybridizers have produced plants that may indeed be subgeneric crosses. Samples are undergoing DNA testing. Stay tuned.) The subgenera are Brachyceras, most of the day blooming tropicals; Lotos, most of the tropical night bloomers; Nymphaea, all of the hardies; Hydrocallis, night blooming tropicals rarely found in cultivation; Anecphya, day blooming tropicals from Australia and the East Indies. See the Waterlily Family Tree for more information.
We love tropical lilies (which also love us), large ones and
those that are very cold tolerant, especially those that are
both. This has led us to concentrate on the big, beautiful and
very tough offspring of N. ampla. Our ampla was
a gift from Bill Frase and the same as he used in creating 'Floyd
Wolfarth', 'Bill 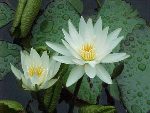 Yohn'
and 'Lou Pignolet'. Our examples are from this type of Brachyceras
though the techniques apply to all subgenera. Ampla itself
is not especially large, has a simple white flower with interestingly
ranked stamens and bronze pads that look more like night bloomer
pads than the usual day bloomers. Ampla is a great parent,
not only setting seed easily but also stamping itself on progeny
with large flowers, a leathery quality to pads and cold tolerance.
Yohn'
and 'Lou Pignolet'. Our examples are from this type of Brachyceras
though the techniques apply to all subgenera. Ampla itself
is not especially large, has a simple white flower with interestingly
ranked stamens and bronze pads that look more like night bloomer
pads than the usual day bloomers. Ampla is a great parent,
not only setting seed easily but also stamping itself on progeny
with large flowers, a leathery quality to pads and cold tolerance.
It should be mentioned at this point that, here in Florida or in greenhouses, breeding can take place almost year round. This is less and less the case the farther north you go, with the breeding season limited to early fall in outdoor ponds. Viability of both male (pollen) and female (stigma) flower parts is greatly affected by weather. Certain ones can also just be persnickety, producing viable pollen or setting seed only at certain times.
Some of the terminology of hybridizing used offhandedly and
interchangeably can also be confusing! Some of the terms that
refer to Mom are pod parent, seed parent and female parts such
as stigma and stigmatic cup. Dad is known as pollen parent and
his male parts are stamens, a part of which is the anther (the
pollen bearing portion of the stamen).
The "Code" (International Code of Botanical Nomenclature)
allows for listing parents alphabetically when expressing crosses
but it also permits giving the pod parent first and the pollen
parent second, the method we prefer and always use. An example
would be N. ampla (Mom) x N. 'Indian Goddess' (Dad)
= N. 'Bill Frase'.
The Pollination Process
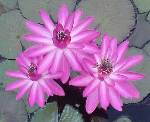
Most waterlilies open for three days in succession. In the first day flower, the stamens stand straight up and there is fluid in the stigmatic cup, also known as nectar. It's this new flower that is the most receptive to breeding, even though it's own anthers (the part that contains the pollen bed) rarely produce pollen on the first day. The second day, the outer stamens lean outward and produce some pollen. The third day, the middle rank of stamens flare outward with the inner stamens sometimes leaning inward. All produce LOTS of pollen, even though the stigma is less receptive as the days pass.
 First, second, third day flowers of tropical day bloomers of Brachyceras |
 First, second, third day flowers of tropical night bloomers of Lotos |
 First, third and fifth day flowers of tropical day bloomers of Anecphya |
 First, second, third day flowers of hardies, subgenus Nymphaea |
 |
We select a first day flower to be the mother and emasculate it so that its own pollen doesn't affect our cross. This means removing the stamens completely by plucking them with fingers, tweezers or scissors. This should be as close to the stigma as possible without damaging it so that we are sure the anther portion of the stamen is removed. No pieces should be left in the stigma or nestled in the petals because the pollen can, in rare cases, continue to develop from the cut first day anther and corrupt the cross. Some hybridizers emasculate the day BEFORE first opening. | |
 |
|
|
|
If we have been smart we have already gone looking for a second or third day flower to be pollen donor. Sometimes both second and third day flowers are open on the same plant so we harvest from both. We check for pollen if it's not visible by rolling a few stamens between thumb and finger, hoping to see it on the fingertip and feel the distinctive "talcum powder" texture. Anthers are plucked with fingers, tweezers or scissors and can be placed in a little container though the palm of the hand serves for us. In some flowers the anthers are lower on the total stamen assembly than in others so we have to be careful to get the right part! |
|
|
 |
|
|
 |
Returning to the prepared prospective pod parent, we drop the anthers into the stigma and poke them well into the nectar. Pollen can be extracted from the donor anthers or tips can be removed to increase pollen concentration, possibly improving the success rate, but this is time consuming and we skip the step. We close the flower, cover it with cheesecloth, secure it with a rubber band and tag the stem with the cross information. Old pantyhose also make a great cover. | |
 |


Once in the stigma, individual grains of pollen germinate making a tube. The pollen tube makes its way down through the stigmatic surface to an individual ovule within the ovaries and allows the ovule to be fertilized. It is then an infant seed. The term seed set refers to the successful fertilization of ovules. Waterlily carpels, very like the sections of an orange, encase the ovaries and their soon to be seeds.
Happy Accidents
There are times that Mother Nature takes care of the process for us. Self-pollination occurs easily in some plants. Bees and other insects can introduce pollen from other flowers for natural cross-pollination. Letting flowers "self" or be crossed incidentally can yield wonderful surprise packages. The only drawback is that the parentage can only be guessed. Selfs and crosses can occur in the same pod unless the selfed flower is closed and covered to prevent accidental crossing. Many of the nicest cultivars offered in the trade were originally "chance" seedlings.
The Pod
Now we watch and wait. Within a week or so, the stem of a fertilized pod will develop a distinct "crook" in its neck, setting the pod face up. It will sink to the bottom while it develops. Maturation can take as little as 15 days and as much as eight weeks, dependent mainly on water temperatures. The pod will swell markedly. Unset pods will soon rot off, often part way along the stem.
 Once
the pod has sunk well down into the water we remove the cheesecloth
and place a plastic bag perforated with tiny holes over it, sealing
it loosely around the stem. The holes allow for some exchange
of gasses but won't let any seeds escape. As the pod nears maturity,
removing the bag briefly to remove
Once
the pod has sunk well down into the water we remove the cheesecloth
and place a plastic bag perforated with tiny holes over it, sealing
it loosely around the stem. The holes allow for some exchange
of gasses but won't let any seeds escape. As the pod nears maturity,
removing the bag briefly to remove  rotting
petals and sepals carefully will result in less debris mixed
with the seeds. When the pod ruptures, seeds and often the whole
carpel assembly will float to the surface if not bagged or up
into the bag which comes briefly to the surface. We collect the
bag and dump the contents into a small bucket, rinsing the bag
several times to be sure we have removed all the seeds.
rotting
petals and sepals carefully will result in less debris mixed
with the seeds. When the pod ruptures, seeds and often the whole
carpel assembly will float to the surface if not bagged or up
into the bag which comes briefly to the surface. We collect the
bag and dump the contents into a small bucket, rinsing the bag
several times to be sure we have removed all the seeds.
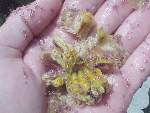 The
tiny white, tan or light gray seeds have not been fertilized
and are not viable. Small reddish or purplish seeds are immature
and not viable. Larger dark seeds, which can be black, gray,
brown or green, sometimes within the same pod, are those that
can viable. In the first day or two after collection, these will
float by means of a thin gelatinous coating called an aril. Soon
the aril rots off and the good seeds sink to the bottom of the
container. The debris can then be "decanted" by swirling
and pouring off the water several times, stopping short of pouring
out the heavier viable seeds. A fine strainer can be helpful
here to prevent accidental loss of seeds. Craig Presnell adds,
"When decanting to clean the seed, I use a container with
a small inner lip. The debris flows over it, but it tends to
trap any seed that tries to make a break for it."
The
tiny white, tan or light gray seeds have not been fertilized
and are not viable. Small reddish or purplish seeds are immature
and not viable. Larger dark seeds, which can be black, gray,
brown or green, sometimes within the same pod, are those that
can viable. In the first day or two after collection, these will
float by means of a thin gelatinous coating called an aril. Soon
the aril rots off and the good seeds sink to the bottom of the
container. The debris can then be "decanted" by swirling
and pouring off the water several times, stopping short of pouring
out the heavier viable seeds. A fine strainer can be helpful
here to prevent accidental loss of seeds. Craig Presnell adds,
"When decanting to clean the seed, I use a container with
a small inner lip. The debris flows over it, but it tends to
trap any seed that tries to make a break for it."
 It
is possible for pods to remain on the plant to full term, rupture
normally and not contain viable seeds. Sometimes this is seasonal
and sometimes it can be that the pod parent is essentially sterile.
Some plants that are sterile as female parents make viable pollen
so can act as Dads. The reverse is also sometimes true -- some
varieties that do not make pollen will set seed.
It
is possible for pods to remain on the plant to full term, rupture
normally and not contain viable seeds. Sometimes this is seasonal
and sometimes it can be that the pod parent is essentially sterile.
Some plants that are sterile as female parents make viable pollen
so can act as Dads. The reverse is also sometimes true -- some
varieties that do not make pollen will set seed.
At this point, seeds can be planted or stored.