|
|
|
|
|
|
|
|
|
|
|
|
|
|
|
2002 Updates

Let us say at the outset that the recommendations here are our opinions as of now. As we learn more about Victoria, some ideas will change and we will make regular updates to these guidelines. Victoria responds differently to various soils, water and nutrients and, though we hope what works for us will work for you, you may have to experiment on your own and we would appreciate any and all feedback!

|
 |
Victoria seeds must be stored in water or they will not survive. Drying out for even a few minutes will kill the embryos. They can be stored in jars or ziplock bags (that don't leak!) in whatever water is available. We use our lightly chlorinated city water but others use pond or well water. |
 Seeds
can be stored at room temperature (for us 76F or 24C) unless
they begin to sprout when you don't want them to. Storing the
following at cooler temperatures can greatly reduce viability
-- amazonica, 'Adventure', 'Challenger' and 'Columbia'.
Fresh 'Longwood Hybrid', 'Atlantis', 'Discovery' and cruziana
often require storage at 60F (16C) to prevent sprouting and cruziana
may actually benefit from this cool storage.
Seeds
can be stored at room temperature (for us 76F or 24C) unless
they begin to sprout when you don't want them to. Storing the
following at cooler temperatures can greatly reduce viability
-- amazonica, 'Adventure', 'Challenger' and 'Columbia'.
Fresh 'Longwood Hybrid', 'Atlantis', 'Discovery' and cruziana
often require storage at 60F (16C) to prevent sprouting and cruziana
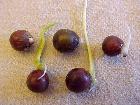
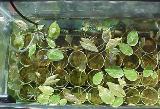
may actually benefit from this cool storage.As a humorous side note, the cruziana seedlings at the right sprouted in our 60F (16C) storage refrigerator in the dark. This IS the exception and not the norm.
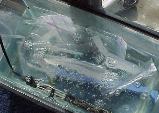
For starting seeds, we set up a small aquarium with submersible
heater half full of city water maintained at 85F (29C) minimum.
We also use an airstone, primarily to help keep the water circulated
and the temperature even. The seeds are placed in Glad snack
bags. We do not perforate the bags so the occasional bad seed
doesn't foul all the water. Water temperature as high as 92F
(33C) may benefit amazonica and others.
"Nicking"
For us, very few 'Adventure', amazonica, 'Challenger' or 'Columbia' sprout even at 85F so we "nick" them, removing the operculum carefully with a scalpel. This is very different than scarifying the seeds in random places since the embryo is directly beneath the operculum. Nicking the seed coating in places other than at the operculum will damage the seeds.
March 2002 - Nicking Step by Step
For earlier details about nicking see Open The Door!
By nicking, our germination rates improve dramatically and usually in 3 to 12 days. After about three weeks, we inspect unsprouted seeds and renick them, which stimulates another flurry of sprouts.
|
|
 |
 |
|
Sprout Day 1 |
|
Sprouts Days 1-5 |

Though we can accomodate seedlings year round, nicking allows us and others to predict sprouting more accurately counting backwards from setting out dates. We nick all seeds that are on a "timetable". Our evidence indicates that plants started in late fall and early winter may be stronger as adults, even though growth is slower initially than those started in spring.

For seedlings started indoors, we use 10 gallon aquariums with
submersible heater at 85F (29C) to 92F (33C) and an airstone
with surface turbulance limited. We fill the aquariums slightly
more than half full with city water so that the seedlings will
have 4-8" of water over them. We either add a dechlorinator
or after the chlorine has dissipated, add Cycle, an aquarium
product of multiple beneficial bacteria which aids in balance.
The aquariums are in a sunny window.
For outside setup, we use stock tanks filled with pond water and 1500 watt stock tank heaters with thermostats, wrap them with insulation and cover with clear plastic. The outside setup allows us to add fish, snails and other plants for better balance.
March 2002 - Especially in aquariums, we recommend a 25% exchange of water weekly to avoid the buildup of unwanted minerals or excessive hardness. At all costs avoid using water that has passed through a water softener or from a well with salt intrusion. Water pH doesn't seem to be an issue nor does algae -- algae bothers people more than it bothers the plants.
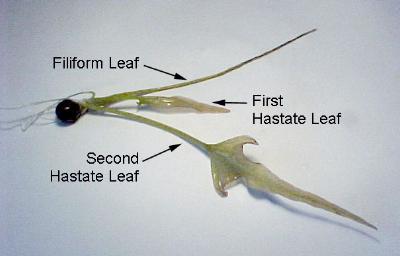
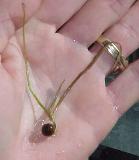
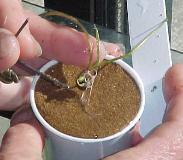
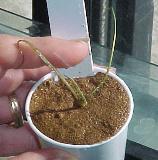
In 6 to 12 days from germination, healthy seedlings have their filiform and hastate leaves as well as roots and this is when we plant them. We plant in three ounce plastic cups and use orchid wire to make small pins to anchor the seedlings.
We plant in plain sand dug from a hole on the dune on the ocean side of our garden, washed once to remove any salt. We have tried bagged top soil, a ceramic aquatic medium, cat litter, a local sand/clay mix, additives such as PondTabb pieces or crumbs, granular fertilizer, bone meal and SuperThrive sometimes mixed with our sand and in every possible combination. Only the strongest seedlings did not disintegrate almost immediately. For us, no nutrients whatsoever are the key to success at this stage.
|
|
|
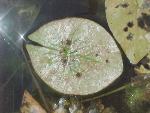
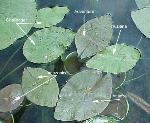
The first floating leaf should appear at the surface of the water in 6 to 12 days after planting, a total of 12 to 24 days from sprouting. It seems to us that seedlings that develop at a rate slower than this have a much lower chance of survival. Water temperature of 85F (29C) or higher seems critical along with good light. In sand, some nutrients must be supplied but in other soils it may not be necessary at this stage.
|
May 2002 |
||
|
It is at the first few floating leaves stage that most
of us struggle with Victoria babies. We too experience
the We believe that the "melt" of Victoria leaves is caused by an extreme sensitivity to hard water, not a factor with tropical waterlily babies. We stress again the need to make 25% water changes in the aquarium or tank weekly. We believe the "burn" is from excessive nutrients. Growth where the leaves remain the same size or get smaller, or where new leaves are not produced fast enough to sustain the plants, is caused by inadequate nutrients. The trick is to balance potting soil with nutrients in the exact proportion needed by each variety. We've done a lot of experimenting with potting media and nutrients and here is the best we've come up with. We plant in plain once-washed dune sand with no additives
when the seedlings have hastates and first roots. A caution here
-- don't wait too long to plant at this stage, especially if
the babies are in baggies. If they start to "melt"
at all in the bags, they are gonners. We use 3 ounce Solo cups
from the grocery store. When the first floating leaf reaches
the surface we give 1cc of our "cocktail", repeating
every 7 We realize this is very complicated but our efforts to simplify it have failed. We believe that Victorias have a higher nitrogen/iron requirement than other aquatics. They need the type of nutrients in PondTabbs but it needs to be in combination with organic nutrients and a biostimulant to prevent burning. The cocktail is injected into the soil with a 10cc syringe and 16 guage needle available from most feed stores. When we boost to 9 ounce cups, we give 2-4cc of the cocktail weekly depending on plant size. We will appreciate any feedback about success and failure at this stage. For EXACT recipes, rates and schedules see "Weakly Weekly" For more about biostimulants see "Our Adventure 2001 - Roots" |
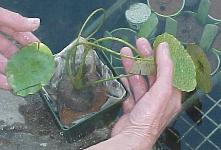
Potting Larger
We consider Victoria seedlings to be "over the hump", fairly certain to survive, when they have made about four floating leaves, each increasing in size from the previous one. When the seedlings produce leaves more rounded than arrowhead-shaped and their stems thicken, they are ready to be boosted to larger pots, for us 3.5" square plastic ones lined with newspaper or tall 9 ounce plastic cups. Depending on the plant itself, light and temperature, this takes place in 4 to 8 weeks from sprouting. We again use our dune sand and feed 2-4cc of the above cocktail weekly. More details
 |
|
 |
|
|
|
|
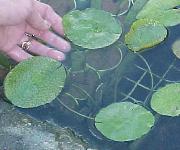
When we see roots looping up out of the soil in the 9 ounce cups it's time for the next increase in pot size. They go into 6" round pots with holes lined with newspaper. We peel away the plastic cup and set the root ball in the bottom of the new pot, filling around it, so that we can add soil as the plant grows vertically. More details We determine weekly fertilizer by pad size and number. Through both of these stages we try to keep the plants at 82-86F (28-30C) water temperatures. Once the plants are well established in their new pots, water temp can be decreased, for the hybrids especially. At 70F (21C) they will continue to increase in size, though warmer is better. If left in these smaller pots, our experience is that the plants stall in their growth, remaining about the same size. Once they are given more space, the plants resume increasing their pad size.
Final planting is extremely variable. Container size can be
from 3 to 200 gallons. We find that we can  grow
plants with 30-45" pads and numerous blooms through a whole
season in 10 gallons of soil, ideal if space is limited. We honestly
can't imagine that a 200 gallon pot is necessary for fabulous
growth but some use this size. Somewhere in the middle, 20 to
50 gallons will produce superb plants. Lerio pots are available
in many sizes but large Rubbermaid containers, concrete mixing
tubs and all sorts of other containers work just fine and are
probably cheaper.
grow
plants with 30-45" pads and numerous blooms through a whole
season in 10 gallons of soil, ideal if space is limited. We honestly
can't imagine that a 200 gallon pot is necessary for fabulous
growth but some use this size. Somewhere in the middle, 20 to
50 gallons will produce superb plants. Lerio pots are available
in many sizes but large Rubbermaid containers, concrete mixing
tubs and all sorts of other containers work just fine and are
probably cheaper.
Soil can be anything from our just-better-than-beach sand
to heavy topsoil with cow manure. Clay or a soil with clay content
is excellent but not a necessity. Our best recommendation is
to use what is readily available from your yard or garden center.
Victorias are not fussy about soil as adults. The root
ball should be placed in the bottom of the container with the
surrounding soil at the level of the crown so that soil can be
added through the season as the plant grows upward.
We grow most of our adult plants in our version of natural bottom ponds. All are concrete with deeper holes built into the bottoms and a layer of sand (8-12") added back. Early in the season we dig these holes out and place the plants in them as deep as possible, adding soil around the crowns when we see new roots (which form at the bases of stems).
Victorias are heavy feeders and in many soils it is difficult to overdo the nutrients. In sand such as ours, it is very possible to overfeed them. The higher the sand component of the soil, the greater the care that must be given to fertilizer quantities. We have excellent results feeding a combination of nutrients weekly based on pad surface area. We give PondTabbs and inject a combination of Iron Green, fish emulsion and either Roots or Seamate around them. The proportions are approximately the same as in the cocktail we give our babies though much less dilute.
In cooler conditions, aphids can be a problem, especially for young plants. Our best suggestion is to wash them off as needed. Larvae of the China Mark moth can also also attack young pads but are rarely much of a problem with adults. Hand picking them off, remembering to check the pad reverses, is usually adequate treatment. Turtles and ducks are enemies!
Though we don't start plants in a greenhouse, many do. Excessive heat and/or humidity in the greenhouse can damage leaves, creating light colored patches in the case of high heat, dark patches if the leaves can't dry from humidity, both types of damage with both high heat and humidity. When taking plants outside from the greenhouse, care must be taken not to sunburn them. They can be placed where they get only an hour or two of sun initially or protected with some type of screening until they "harden".
Because of their upward growth, Victorias DO NOT LIKE
their new feeder  roots
above the soil and they DO NOT LIKE the cavity that forms under
the crown as the base of the huge pineapple-like rhizome rots.
In addition to having soil added around the crown, the plants
should be pushed down regularly (heavy gloves or wader-clad feet!)
to keep this cavity at a minimum. For those with short growing
seasons, this may not be an issue but it definitely lengthens
the life of the plants for those with longer seasons.
roots
above the soil and they DO NOT LIKE the cavity that forms under
the crown as the base of the huge pineapple-like rhizome rots.
In addition to having soil added around the crown, the plants
should be pushed down regularly (heavy gloves or wader-clad feet!)
to keep this cavity at a minimum. For those with short growing
seasons, this may not be an issue but it definitely lengthens
the life of the plants for those with longer seasons.
More Detailed "Lengthening The Life Of Victoria"
And "Step By Step Repotting Victoria"
Victorias also DO NOT LIKE any foreign objects on their pads!
Even a tiny leaf left on the surface will create a blemish. Many
foreign bodies will result in premature deterioration of the
pad. Where waterlilies are perfectly happy overlapping pads and
competing for space, this is not so with Victoria.
Victorias can be reluctant to bloom if their pads are damaged or removed prematurely. The second is especially true with plants in small spaces or small containers.
|
|
|
|
|
|
|
|
|
|
|
|
|
|
|
|
Water Gardening | Water Gardening Friends | New This Month Kit & Ben Knotts | Our Garden | Search The Site | Home |